Showing posts with label Tuts. Show all posts


Hey whats up guys? This is Santhosh kumar for a tut.
This problem is caused by the damaged peripherals mostly. But don't worry this could also be due to the cmos problems. CMOS is a battery which is placed in your cpu's motherboard. This also acts as a RAM. Taking this as an issue will let you diagnose the problem from the basic test. But sadly there are no ways to identify if that causes the problem in your CPU. Some people might find the odd functions of their CPU fans and the casing fans. This could also probably be a symptom of the CMOS trouble causings.
This will lead you through the fix. If you some basica about the CPU, motherboard then you could have closed this tab already. If you are still reading this you absolutely have'nt found the solution yet from the above texts. Don't worry, I'll help you.


The picture shown here is the CMOS that i mentioned above. You will have to replace this one with a new one. The price of this CMOS ranges from 10 INR to 20 INR. So changing this will not be a problem..

Remove your CPU chassis and keep your screws safe.
Remove your RAM before you perform this action.
Then find the place where the CMOS is in your CPU.
I said so because, this changes from CPU to CPU even with the same OEM.
Now replace the CMOS with a new one.
Now you know what to do.
Run the computer now.
If you still get the error, check your /vga cable which connects your monitor and the CPU. Some CPUs might have two VGA connector ports as in mine. So plug in the monitor's VGA cable into the VGA port from your GPU. Find out where it is when you open your chassis.
You are done fixing it.
Have a good day.

@fojoheartthrobe
Hey guys Whats up? It's Santhosh kumar again. Good to see you guys supporting my blog. Since a full time blogger I had to design some themes for the blog to improve the looks and the performance and i'm trying to keep the responsive blog templates. I have already made an android app which if you might have missed, let me know in the comments below and I'll share the link. I'ts available in the blog itself. Just search PazSan app.

Now coming ot the point. A lot of times I've had troubles connecting to google Play Store saying that "No connection" or "Server timed out". This is because of the Host file in the system directory of your ROM. So by now you must have known this article is only for the root users. My previous article also for the root users. Don't worry  I'll get my camera in a couple of weeks. And from then on I will make a lot of vids  for YT. Meanwhile some of my friends will be writing stuff here.

However my previous article was also with a similar issue. I was asked to rewrite the article so that people could find it easily with the tags. So here it goes.

The app might open and keep loading for ever. For example you can't sign into google, you can't use gmail app, you can't use the calendar, and so and so. And my nightmare being the youtube app which won't load. Some might find alternative apps for the above said apps like I did when I din't know the solution. The most important thing is that Google Play Store will not load at all. You will get server timed out error. So here's the fix.


Fix:
All you need to do is to add a character in the second line of the hist file which exists in the system\etc in the root directory. I'll put on a step by step procedure on how to do so.

STEP 1:
Get any root file explorer for you device from playstore. If the playstore doesn't work find the apk online and install it.
I personally use MiXplorer which I got from XDA forums. Most of you might use the Root explorer app. Both will work fine.

Just in case you don't know about MiXplorer click here to learn more about the features and why I use it.

STEP 2:
If you are using MiXplorer, swipe from the left to right of the screen and find the label ROOT in the list. When you touch it you will be prompted for the root access. Just provide like you do for other apps. How you navigate to the root folder depends on the file explore you are using. In Root explorer this could be a bit cumbersome for the new users.

STEP 3:
Navigate to " system->etc " and find the file named hosts and open it as a text file.

STEP 4:
You will find some lines of ip address in them.
On the second line, add "#" without quotes.

before edit:
127.0.0.1      localhost
127.81.104.152 android.clients.google.com

after edit:
127.0.0.1      localhost
#127.81.104.152 android.clients.google.com.

Save it and reboot the phone. Now you will have every google apps working and you need not find any alternative apps for the ones offered by google.

Hi guys this is Fojoheartthrobe back to blogger posts again.
It's been a long time since then.
This article is pretty straight forward about the music players that are good to use for windows PC.
The way I've chosen these two as best is based completely only on the looks, style, and some playback options available like the lyrics, artwork freedom and playlists.

#2 Zune


Zune is the second best for my expectations. Zune is a music player that has the best visualizations than any other music apps. The developers are from @microsoft. So no doubt about the bugs and other compatibility issues. The Zune brings a lot of style to your living room and has less options than ITunes.

UI

As far as the GUI is considered Zune takes the first palce.
The GUI is kinda like the metro UI style.
The playback is crystal clear.
The visualizations are cool mooded with the album arts at the behind changing periodically like tiles.
The songs can be favourited with the heart icon next to the song control pane.
And the most cool thing about the player is that the equalizer like visualizer at bottom of the screen. That is soooo coooool.

playback screenshot
the start screen gives you a tailored structure of what you listened, your pins and playlists of musics ans videos.

start screen with quickplay screen
The start screen has two options to switch between. One is the quickplay and the other is collections.
Collections provide you your complete song collection from your library and some other custom directories from your HDD that you can change in the settings.
The start screen with collections screen

the settings screen that lets you choose the directories  to search music, images and videos
You see those text in the images so small because My screen if a full HD screen. for other resolutions it won't be so.

video playback

The video playback is also good with Zune.

#1 ITunes

As Zune came from the microsoft kitchen, ITunes came from the Apple garden. But ITunes came out first for the connectivity purpose of the IPhone with pc and mac. Itunes's GUI is not that awesome as before because, owing to it's new look and the conversion from itunes version 10.x to 11.0 the unique feature of itunes called coverflow. Yes the coverflow feature has been cut off. Yet the visualizations have got much better than it was before.
The freedom to change the album art work, the freedom to add lyrics, finding match songs via genius are some of the reasons to stick with ITunes.

the start screen with album view
Unlike Zune ITunes provides a different kinda look which makes me feel like metallic UI themed.
As I've said ITunes provide a lot of options other than Zune. 

visualizations of ITunes
And the visualizations rock.
You can feel a lot better when you just stare at the visualizations.

mini player
The mini player is also provided by Zune and the choice to make it visible on top of all windows can be made in both music players.
But the mini player cannot be resized in Zune whereas it can be resized in ITunes.

One more thing is that Zune does not provide keyboard navigation facility.
And ITunes scan be completely controlled by keyboard.


However, to say "best" is next to impossible because, everybody have their own likes and dislikes. These two are best I've ever seen.
Hello guys well i know that the windows 8 and the successor . I have been released a long back.. & the activators have also been released.

But I was not feeling good to post some crack or hacking activator for a leading  operating system even before their next release.

But i had no job today so i'm giving away this information to you all.

The kms activator here can activate all your microsoft packages including product, office etc.

Here's the link


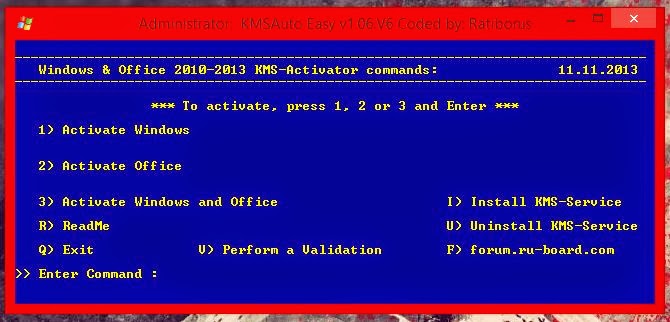
So this is the UI of the file you will be downloading.
All the instructions are pretty straight forward.

First you guys will have to install KM-Service
Type in I and hit enter.

Then depending upon what you are gonna activate, type in the number in the windows and hit enter.

Sit back and relax for a while and your work is done.

And don't forget to restart your computer.

And guys from the next post i'm gonna start a new youtube channel for the blog.

Keep supporting us to share our thoughts.
hey guys it has been a while since i came to the blog, yes and of course i had exams again..
I own a lenovo laptop of series ideapad with label Y510P. Yeah i got it just a month back. :)

I was thinking of installing a new operating system to the windows 8.1 trying to achieve a dual boot. The operating system that i was trying to install was the great Ubuntu Trusty Tahr the 14th sequel of ubuntu.

Talking about the boot manager of windows 8, It has a pretty different style of booting the operating system.
Usually we have a hard disk that is MBR formatted one. But the laptops coming with windwos 8 and above preloaded come with GPT formatted hdd. The hard disk has many partitions to recover in case the operating system got corrupted.

But still there are several ways to convert the GPT partitions to MBR partitions.
But the conversion may take a day for 1TB hdd s. And yet another restriction is that the hard disk that we are partitioning must not have more than four partitions of those including the recovery partitions.
The most important thing is that the windows 8 and above operating systems use UEFI settings to access the bios and to boot.This makes windows 8 and above boot faster than the earlier editions of windows operating systems.
In addition to that windows 8 and above systems have yet another option called Fastboot.
This function is basically turned on by default. But some laptops don't have them turned on by default because of some reasons (I don't know why. /one of my frn's Acer did not have this feature turned on).

Or this might not be turned on if you installed the windows 8 on any machine that previously ran with a previous release of windows other than windows 8.

So here's how to turn it on.

Step 1:

Bring the charm bar or directly search from the charm bar.
use Win+C for bringing up the charm bar. Or use Win+S to search directly.

Search for "power options"

Step 2:

Look for the power button settings on the left pane.
"Choose what power button does"

Step 3:

Select change settings and acquire admin rights.

Step 4:

Scroll down to the "Shutdown settings"
And check the "Turn on Fast Startup".


And boom you are done.


Why turn on Fast Start up?

Fast startup is another exciting feature comes with the windows 8 editions which will help the users to boot their computer faster than it was.
This feature will help you to turn on and shut down at faster rates than the normal time taken.
This feature is also known as Hybrid boot or Hybrid shutdown.
So when this feature is turned on the computer will perform a partial hibernate.

Alternative methods to enable:

The fast startup feature can be enabled by a bat file download method.

TURN ON FASTBOOT

TURN OF FASTBOOT


The bat files are for the key and value given below:

HKEY_LOCAL_MACHINE\SYSTEM\CurrentControlSet\Control\Session Manager\Power


WARNING !!

The problems that you might face are:

When hybrid boot is turned on the with dual boot.

A hard disk (both external and internal )connected to the computer with hybrid boot enabled (and if it is shut down) can cause boot problems when connected to other computers.

For some users the computer might restart now and then.


that's IT

Santhosh kumar

@fojoheartthrobe -> Twitter


@fojo.genius -> Facebook
HOW TO USE ANY SIM IN ANY MODEM ??
1. Insert SIM in Modem.
2. Modem show invalid SIM, just ignore it and close modem software.
3. Start NOKIA PC suite.
4. Goto nokia pc suite connect to internet option.
5. Goto Configure. Select your data card modem,and make all operator apn setting as like when we use nokia mobile connection.
6. Finish set up.
7. Now connect to internet through PC suite.
Done.
Now u can use ur modem with the operator of ur choice
Many of us must have played Call of Duty Modern Warfare 2.
And many of my friends told me that there's a problem arising that could not load fileSysCheck.cfg

I thought that this issue will be so complicated.
but we tried out making a file in text. In the format .txt
and the renamed the file as fileSysCheck.cfg and put that file in the folder PLAYERS what COD MW2 installed.
And then we tried playing that game.
It works 100%. You can even type in your name in the text document
flutter kinectKinect may not be the best way to play games on an Xbox 360, in spite of the fact that some games for the platform are pretty good. However, one place Kinect does shine is in controlling the Xbox interface. It features all kinds of cool gestures that make it easy to control the console without touching the controller. Wouldn't it be awesome if you could get functionality like that on your Mac? With Flutter it's actually possible, and it's easier than you might think to get it up and running.
Of course, Flutter is not as deep as Kinect, as it lacks the hardware and depth sensing technologies. However, it's a very useful tool for listening to music and watching videos, as it allows you to skip songs, rewind, fast forward, play, and pause – all with simple gestures. Instead of digging through open windows to find and pause music, you can simply perform a gesture, and save yourself some valuable time. Plus, it feels really cool stopping music with a gesture, like something out of a sci-fi movie.

Using The App

flutter kinect
When you launch Flutter for the first time, it will run you through a quick calibration so it can learn how you perform the gestures. This takes just a few seconds, as there are only a few gestures you need to know. In case you happen to forget, I will remind you of the gestures again:
flutter mac review
  • Hold palm of hand towards webcam – Pause
  • Point right with thumb with palm facing camera – Skip
  • Point left with thumb with palm facing camera – Go back
flutter mac review
The set up will also ask if you would like to let the app take photos during gestures to help improve accuracy. Personally, I prefer not to have my photo sent to the developers, but at least it asks your permission and does not take photos without your you giving it the okay.
Once you run through the quick set up process, you will be ready to use the program. Out of box, it supports a big list of programs, such as:
  • Spotify
  • iTunes
  • Quicktime
  • Powerpoint
  • VLC
flutter mac review
Most popular programs for media are available, and you will need to set your preferred program, so if you have more than one open, it will know which one the gesture should control. To set the preferred program, simply right-click or CTRL-click the app's icon in the menu bar and go to the drop down.
flutter mac
You may not want to have the program running all the time, and that's simple enough to fix. All you have to do is click the icon and the app will turn off. You can tell it's off because the icon will be lighter, and the light on your webcam will turn off.
flutter mac
Another handy option is the ability to choose whether the application automatically starts up when you turn on your Mac. If you are the kind of person who is constantly consuming one form of media or another, you will probably want this option on. If you plan to only use Flutter occasionally, turning it off might be the way to go for you. Either way, having options is always a good thing!
flutter kinect
If you still can't get the hang of the gestures, fear not, because if you right-click on the icon you can bring up the gesture tutorial again at any time.

Chrome Extension

While I may be covering the Mac application specifically, I would be missing a key part of the experience if I did not mention the awesome Flutter Chrome extension. It offers the same key functionality as the Mac application, but it does it with web-based apps like Netflix, Pandora, YouTube and more.

Conclusion

If you are looking for a way to speed up the process of controlling your music, Flutter is the perfect application for you. It's incredibly easy to use, and let's be honest, it just feels downright cool to control your music using only your hand.

This app is now also available for windows 

community....


This assumes you are using American English versuion of W-7 Language type 1033
All Windows 7 allows is for you check or un-check play start up sound in Windows 7 you have to do the following to change the default sound of your choice

1) Use the following beta program Reshacker from
Download Resource Hacker 3.5.0.82 Beta / 3.4.0.79 - Analyze, change, add, erase or extract resources in EXE and DLL files - Softpedia

2) Locate the file "imageres.dll" in C:\ Windows\System32 folder. For instance, C:\Windows\System32\imageres.dll. Copy that file into a different location, i.e. your desktop.

3) Download ResHacker .

4) Open ResHacker. Open the imageres.dll file in ResHacker.

5) Find the folder that reads "WAVE" and expand everything below that.

6) Right click 1033 (this could have a different name depending on your locale), and click Replace Resource. Click "Open file with new resource", and find the wave file you want to replace it with. Once you're done, in Resource Type, type "WAVE", in Resource Name type "5080", and under Resource Language type "1033" (or whatever number you have). Once done, click Replace.

7) Click File, then click Save. Now you can copy this file to Vista's System32 folder.

Keep the imageres_original.dll file ResHack left behind in case you want to revert back to the original sound.

8) For Windows 7 go back to C:\Windows\System32 directory rename the imageres.dll to Imageres.old then copy and paste the new hacked Imageres.dll into C:\windows\system32 directory

Now you can use this reshacker instead as I used Windows 8 x32 
http://www.angusj.com/resourcehacker/reshack_setup.exe

you can download take ownership from here - Take Ownership Shortcut

I then took ownership of the imageres.dll in System32 folder, so I could change the extension to .old
That way I was able to copy the new imageres.dll file into that folder.

This worked perfectly for me then
To take ownership of files and folders you can use this Tweak and it will give you the option to take ownership when you right click on a file or folder or drive.


When you use take ownership on a folder, it will take ownership of all the files and sub-folders inside the folder as well.

If you added the Open Command Window Here as Administrator context menu item, then adding Take Ownership will remove and replace it.
Take Ownership Shortcut-after.jpgDO NOT TAKE OWNERSHIP of the C: (Windows 7) drive!!

Step 1-> download from here 

Step 2-> Open the downloaded zip file, extract (drag and drop) the .reg files to your desktop, then right click on the extracted .reg file you want to use and click on Merge.
NOTE: If you do not see a Merge option when you right click on the REG file, then you will need to check in Default Programs to set the reg file extension to have it's Current Default program set as Registry Editor(C:\Windows\regedit.exe). Afterwards, try merging the REG file again.

Step 3-> Right click on whatever you want to own and and select take ownership, it works and I have used it heaps.

Are you bored with your old processor? Do you want a new processor with a breath-stopping name but are not going to upgrade any time soon? No need to worry. You can still have that new processor's name displayed in your computer. Well not only that, you can also have a better one than the one you are supposing to buy. Just follow this trick.

With this trick, you can change the name of your processor to a personalized one like My Processor or something extreme like Decacore Processor 50 GHz .  These are just a few examples. You can change the name of your processor to anything you like.
To have one such cool processor's name displayed in your computer, follow these steps:-
  1. Click on Start.
  2. Click on Run.
  3. Type "regedit" without quotes.
  4. Navigate to HKEY_LOCAL_MACHINE/HARDWARE/
  5. From HARDWARE, navigate to DESCRIPTION/System/CentralProcessor/.
  6. In the work area, double click on ProcessorNameString, and change its value according to your choice.
  7. Click OK
Right Click on Computer icon and select properties.The final outcome would be something like the one in the image.

Try it on your PC and show it to your friends to see the fun.

P.S.: Personally, I have recently changed the name of my processor to "iLife Processor 7, Alien Technologies".  Tell me what you change yours to.

Note: This article changes the processor name temporarily. To permanently change processor name, visit change processor name permanently.

Recent Comments